

Welcome to the next post in the Hollyburn Skirt Sew-along! Today marks the first post where we actually start stitching our skirts together!
Incase you've missed any, here are all the posts so far:
- Inspiration (Part 1)
- Inspiration (Part 2)
- Choosing a view
- Sizing
- Choosing and Buying Fabric
- Changing the Length
- An Interview with Tasia
- Pattern Alteration - Removing the Pockets
- Pattern Alteration - Piping on your waistband
- Prewash and Prepare Fabric
- Thoughts on Grading Up in Size
- Choices to make before starting to sew
If you take a look at your Hollyburn instructions you'll see that the first sewing steps are for sewing the pocket onto the skirt front pieces. So that's what we'll do today. We will be covering steps 2-6 (step 1 was fusing interfacing to the pieces that require it, which we already did as part of our cutting).
(I've given each mini-step in the process a little heading, so you can see where one stops and the next starts.)
(I've given each mini-step in the process a little heading, so you can see where one stops and the next starts.)
Line up Pocket and Skirt Front
First up, you need to gather your two skirt front pieces and two pocket pieces:

Now lay the pocket piece to the skirt front, right sides together:

The two pairs of pieces will be mirror images of each other:

When you're lining up the pieces, make sure you carefully match the notches at either end of the pocket seam:

Now pin the two layers together so they don't shift before you've stitched them. I like to put my pins perpendicular to the direction of the seam I'm sewing, about 1-2 inches apart on curves, and further apart on straight sections:

Now pin the two layers together so they don't shift before you've stitched them. I like to put my pins perpendicular to the direction of the seam I'm sewing, about 1-2 inches apart on curves, and further apart on straight sections:
Stitch Pocket Opening Seam
Now we need to sew along that curved pocket edge with a 1.5cm/5/8" seam allowance. On my machine all I need to do is make sure that the needle is in the centre position and line up the edge of the fabric with the '15' mark:
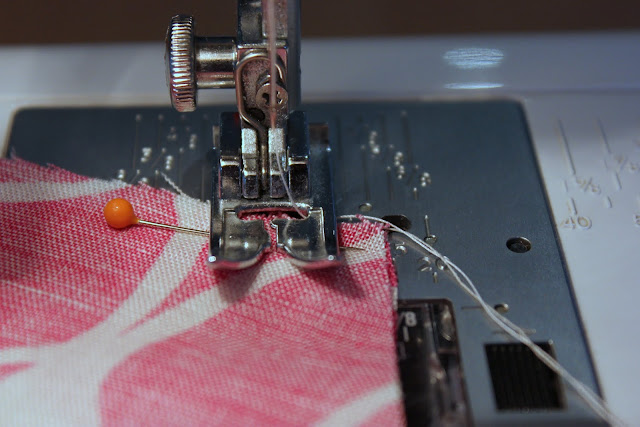
Slowly stitch along the edge, keeping the seam allowance equal as you go. At the beginning and end of the seam you'll want to 'back stitch', which means doing a couple of backwards stitches on top of your forward stitches to reinforce the seam.
Make sure you take the pins out just before you get to them, as if the needle hits a pin it can break the needle or the pin and potentially injure you or damage your machine.
Your stitched seam should look something like this:

Quick Tip: Remember to snip off the ends of the threads at the beginning and end of each seam when you're done stitching it
Trim (and Finish) Seam Allowances
Now trim the seam allowances to approximately half the width:


And make a series of snips, about 1 inch apart, along the curved part of the seam. Make sure you don't quite go all the way to the stitching line, and definitely don't go past it:

This next step is not listed in the instructions, and as you're going to understitch anyway it's not absolutely essential, but if you're concerned about your fabric fraying you might want to finish the seam allowances.
(I didn't do this with my linen version, but did with the black one to demonstrate). To do this one your sewing machine, set your machine to a zig-zag stitch and stitch along the edge of the fabric, with the needle going off the edge as you stitch:

As you get to the curved edge gently pull it straight, the snips will separate making little gaps as they will when you turn it right sides out. When you're done it'll look something like this:

I like to do this step after doing the snips as now there are little chains of thread in those gaps, which stops my zig-zag from potentially unraveling (as it would if I snipped after zig-zagging).
Understitch Pocket Opening Seam
Now we need to understitch the seam allowance of the seam we just sewed. Adding this line of understitching will encourage the seam allowances to sit in the correct place and give the pocket a much neater edge.
Open out the seam we just stitched and ensure that the seam allowances are facing towards the pocket piece. In this photo the pocket is on the right, and the skirt front on the left:

Now we need to do a line of stitching just to the side of the seam on the pocket piece, stitching the seam allowances and the pocket together. I have a top-stitching foot for my machine, which has a piece of black metal down the middle in front of the foot, which helps me keep a straight line. Using this foot, I line up that piece of metal with the seam and then move the needle to the right very slightly so that I'm stitching just to the right of the seam:

If you don't have a top-stitching foot you can just use your normal foot and carefully keep the seam line just to the right of your needle:

As you stitch, make sure you keep the seam pulled open fairly taught, and make sure that the seam allowance is still facing towards the pocket:

And that's understitching! Your understitching should look something like this (can you just about see the seam allowance through the fabric?):

Press Pocket Opening Seam
Now to press that beautiful seam you've just done. On your ironing board, place the pocket right sides together, with the pocket facing up. Now carefully press the pocket seam so that the seam line is just to the inside of the pocket:

Quick Tip: Remember to press, not iron! Lift the iron to move it, don't drag it along the fabric.
Your pressed seam should look something like this from the inside:
And this from the outside:
Sew Bottom of Pocket - Pattern Instruction Option
The next step is to sew the seam along the bottom of the pocket. I am going to show you two options - the first is the way the instructions say to do it - by stitching the seam then finishing the seam allowance with a zig-zag stitch. The second is by doing a french seam where the raw edge is completely enclosed.
To follow the instructions in the pattern, you need to fold the pocket piece in half along the fold line RIGHT SIDES TOGETHER.
Before you fold your skirt and pocket piece will look something like this:

... and folded something like this:

Now pin along that edge (just like before), and stitch along leaving a 1.5cm seam allowance (just like before), and zig-zag along the edge to stop the edges fraying (just like before). It should look something like this:

Sew Bottom of Pocket - French Seam Option
If you want the inside of your skirt to look that little bit neater, rather than zig-zagging the raw edge of the bottom of the pocket, you can do a french seam instead. To do this all you need to do is two lines of straight stitching, and I'll show you how...
First, fold the pocket in half along the fold line WRONG SIDES TOGETHER. Line up the raw edges and pin:

Now you need to stitch a line of stitching 1/4 of an inch away from the raw edge. If you have a 1/4 inch foot I would suggest using that, otherwise, here is how I did it with my regular foot.
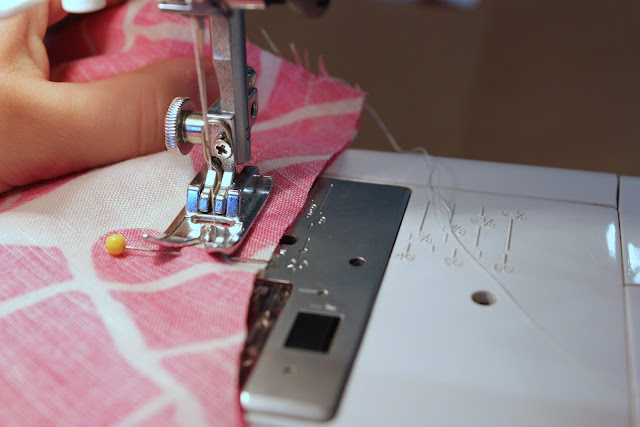
As 1/4 inch is narrower than half the width of my foot, I instead move the needle so that I can still line up the fabric with the edge of the foot as a guide. So start by lining up your fabric, and measure how far across your needle is from the edge of the fabric. On my machine it's a bit over 1/4 inch:

So, I moved the needle across to the right until it was 1/4 inch away from the edge of the foot:

Now, I can sew a line of stitching, keeping the fabric edge lined up with the edge of the foot and I'll know it's 1/4 inch from the edge. Sew this 1/4 inch seam all the way along the bottom of the pocket:

Now trim the seam allowance in half:

and turn the pocket the right way (so that the right sides are facing):

Carefully push the seam all the way open so it lines up along the bottom of the pocket as best you can, and press the seam:

Now we're going to sew another 1/4 inch seam along the bottom of the pocket, enclosing the raw edge from the first seam. Do exactly the same thing again, except this time it's 1/4 inch from the seam rather than a raw edge:

When you're done you'll have a lovely neat pocket seam, without a raw edge in sight:

Here's a closeup of my seam:

Baste pocket to skirt front
We're almost done putting in our pockets! Now all you need to do is baste the pockets to the skirt front, to make the skirt front essentially one piece.
Lay your skirt front out flat, with the pocket flat underneath:

Line up the notch on the side and top of the pocket with the pocket opening edge:

And using a long stitch length on your machine sew the three layers together (this is basting):

You can do this line of basting with any seam allowance, but I tend to do it at about 1cm, so that it is within the 1.5cm seam allowance we'll be using to assemble the skirt later.

And that's it! We're done putting in the pockets! If you didn't do both pockets at the same time, now just go back to the top and repeat the process exactly again for the other pocket!
Tomorrow I'll be back with the next steps for sewing up the skirt.
oh so that's a french seam!! I didn't get it before but now I see what all the fuss is about. No raw edges! Thanks for doing this - I'm going to everything from now on with French Seams - I don't like the way raw edges look. Can't wait to get home to start sewing up my skirt :)
ReplyDeleteThey don't work for anything - on opposing curved seams they don't always work (eg the seam for a sleeve to armhole), or on seams that need to be pressed open. I will be covering another alternative (hong kong bound seams) that fully encloses raw edges as part of the sew-along.
Deleteah, that may be why I was having trouble with the blouse I'm working on lol - thanks for letting me know!
DeleteThank you so much for this. I've never sewn pockets before, and would never have thought of french seams there.
ReplyDeleteYour Sew Along is Fantastic! I just got my pattern today, cannot wait to get started!
ReplyDeleteFinally caught up with you on the sew-along Rachel :)
ReplyDeleteMost machines that are computerized will also have a LED display that serves as a monitor on how things are going during the sewing process. It can help in choosing the different functions, adjusting for various speeds, forward and backward stitching, and error messages if any type of malfunction occurs. Best computerized sewing machines from top brands in India
ReplyDelete